interesting things about virtual function
class Base{

virtual void test1()
 {
printf("test1()in Base \n");
 }

virtual void test2(int x=5)
 {
 printf("test2(%d)in Base:\n",x);
 }

}

class Derived: public Base

{

virtual void test1(int x=6) // the virtual keyword is not needed
 {
printf("test1(%d)in Derived \n",x);
 }

virtual void test2(int x=6)   //the virtual keyword is not needed
 {
printf("test2(%d)in Derived\n",x);
 }

}

Use use;
 Base* base = &use;
 base->test1();   //print out is : test1() in Base, the reason is test1() in Base and Derived has different signature, no override.

base->test2(); //print out is : test2(5) in Derived the test2() in override, but default value does not have virtual property.
Synchronized Age Map
I often need a synchronized map in multiple threads environment. developed a basic one , if you have any comments to improve it, please let me know.
/*
* Licensed to the Apache Software Foundation (ASF) under one or more
* contributor license agreements.  See the NOTICE file distributed with
* this work for additional information regarding copyright ownership.
* The ASF licenses this file to You under the Apache License, Version 2.0
* (the "License"); you may not use this file except in compliance with
* the License.  You may obtain a copy of the License at
*
*     http://www.apache.org/licenses/LICENSE-2.0
*
* Unless required by applicable law or agreed to in writing, software
* distributed under the License is distributed on an "AS IS" BASIS,
* WITHOUT WARRANTIES OR CONDITIONS OF ANY KIND, either express or implied.
* See the License for the specific language governing permissions and
* limitations under the License.
*/
 pthread_mutexattr_t mutex_attr;
 pthread_mutexattr_init(&mutex_attr);
 pthread_mutexattr_settype(&mutex_attr, PTHREAD_MUTEX_RECURSIVE);
 pthread_mutex_init(&mutex_, &mutex_attr);
 // pthread_mutex_init(&mutex_, NULL);
dyndns python script auto update
#!/usr/bin/python

import sys,re,base64,string,cookielib, urllib, urllib2,httplib

login = 'xxx'
password = 'xxx'

hostlist='xxx.xxx.xxx'  <--- your host name

m=urllib.urlopen('<a href="http://checkip.dyndns.org/')">http://checkip.dyndns.org/')</a>
if m :
content = m.read()
else :
print ' could not connect to external network '
sys.exit(1)

match = re.search(r'<body>Current IP Address: (\S)+</body>',content)
if not match :
print ' could not get my external ip address'
sys.exit(2)

ipaddress = match.group(0)
print 'our external IP address is :'+ ipaddress

updatehost = "members.dyndns.org"
fakeagent = "Mozilla/4.0 (compatible; MSIE 7.0; Windows NT 6.0)"
updatepage = "/nic/update"
updateprefix = updatepage + "?system=custom&hostname="
updatesuffix = '&myip='+ipaddress

h2 = httplib.HTTPS(updatehost)
h2.putrequest("GET", updateprefix + hostlist + updatesuffix)
h2.putheader("HOST", updatehost)
h2.putheader("USER-AGENT", fakeagent)
authstring = base64.encodestring(login + ":" + password)
authstring = string.replace(authstring, "12", "")
h2.putheader("AUTHORIZATION", "Basic " + authstring)
h2.endheaders()

errcode, errmsg, headers = h2.getreply()

# try to get the html text
try:
fp = h2.getfile()
httpdata = fp.read()
fp.close()
except:
httpdata = "No output from http request."
fp.close()

print httpdata
config voicemail in asterisk
1) Config exim4
http://www.manu-j.com/blog/wordpress-exim4-ubuntu-gmail-smtp/75/
2) Config asterisk
http://rblondon.blogspot.com/2008/02/asterisk-voicemail-quick-exim4-notes.html
I don’t see a need to define ( mailcmd=/usr/exim/bin/exim –t )
Asterisk Voicemail – Quick Exim4 notes
After installing asterisk I set up the voicemail configuration. First un apt-get install exim4 and then run pkg-reconfigure exim4-config and follow the instructions.
After the configuration exim4 should restart itself but if not use /etc/init.d/exim4 restart.
Configure the voicemail.conf file as follows:
[general]
format=wav
serveremail=asterisk
attach=yes
skipms=3000
maxsilence=10
silencethreshold=128
maxlogins=3
pbxskip=yes
fromstring=Voicemail
emailbody=Dear ${VM_NAME}:\n\n\tjust wanted to let you know you were just left a ${VM_DUR} long message (number ${VM_MSGNUM})\nin mailbox ${VM_MAILBOX} from ${VM_CALLERID}, on ${VM_DATE}. The message is attached. Thanks!\n\n\t\t\t\t\n
emaildateformat=%A, %B %d, %Y at %r
sendvoicemail=no
delete=yes
[zonemessages]
eastern=America/New_York|’vm-received’ Q ‘digits/at’ IMp
central=America/Chicago|’vm-received’ Q ‘digits/at’ IMp
central24=America/Chicago|’vm-received’ q ‘digits/at’ H N ‘hours’
military=Zulu|’vm-received’ q ‘digits/at’ H N ‘hours’ ‘phonetic/z_p’
european=Europe/Copenhagen|’vm-received’ a d b ‘digits/at’ HM
[default]
89300 => 89300,User1,user1@mailserver.com
Now on Sip.con add the mailbox line (mailbox account and context of voicemail.conf)
[89300]
type=friend
regexten=89300
context=default
mailbox=89300@default
secret=89300
username=89300
callerid=”User1″ <89300>
host=dynamic
nat=yes
canreinvite=no
disallow=all
allow=alaw
allow=ulaw
dtmfmode=inband
Finally on extensions.conf set each SIP extensions (will use macros later) to wait for 20 seconds and go to Voicemails as follows:
[default]
exten => 89300,1,Dial(SIP/89300,20)
exten => 89300,2,VoiceMail(89300@default)
exten => 89300,3,PlayBack(vm-goodbye)
exten => 89300,4,HangUp()
3) Multiple recipients
http://www.voip-info.org/wiki/index.php?page=Asterisk+config+voicemail.conf
– sudo vim /etc/mail/aliases
– Example from voicemail.com: 1234 => 1234,Sample User,msmith,,attach=yes
– Example from /etc/mail/aliases: msmith: <msmith@yourmail.com>, msmith@othermail.com
– sudo newaliases
4) More flexible script approach
http://tonylandis.com/uncategorized/asterisk-voicemail-sending-emailing-custom/
#!/usr/bin/php -q
<?php
/**
 * ASTERISK PBX VOICEMAIL MAILER
 *
 * @author Tony Landis
 * @link http://www.tonylandis.com
 * @license Use how you like it, just please don't remove or alter this PHPDoc
 */

#
# config smtp info
#
$mail_lib_path  = "/var/www/inc/phpmailer/";	// path to the phpmailer library
$ast_vm_path	= "/var/spool/asterisk/voicemail/default/{MAILBOX}/INBOX/"; // where asterisk mailboxes are located
$ast_vm_ext	= "wav";	// voicemail recording file extensions to look for
$from		= "asterisk-pbx@domain.com";	// from e-mail address to use
$fromName	= "Asterisk PBX Voicemail";	// from name to use when sending email
$host           = "mail.domainn.com";	// smtp host
$username       = ""; // smtp username
$password       = "";	// smtp password
$port 		= "25";	// smtp port

#
# a few php settings
#
error_reporting(0);
set_time_limit(30);

#
# get args from STDIN
#
$args = array();
for($i=0; $i<5; $i++) add2array(trim(fgets(STDIN)), $args);

#
# parse out the recipient info
#
if(preg_match('/^\"([a-zA-Z0 ]{1,})\" \<(.+)\>/', $args['To'], $matches)) {
	$toEmail = $matches[2]; # to email
	$toName = $matches[1];	# to name
}

#
# Parse the contents of the subject
#
$subject = explode("|", $args['Subject']);
$mailbox = $subject[0];
$msgnum  = $subject[1];
$callerid= $subject[2];
$duration= $subject[3];

#
# compose the email subject and body
#
$subject = "New voicemail for " . ucfirst($toName);
$body    = "Hello " . ucfirst($toName) . ",\r\n" .
		   "You have a new message in for mailbox # {$mailbox} from {$callerid}, with a duration of {$duration}";

#
# mail class
#
require($mail_lib_path . "class.phpmailer.php");
$mail = new PHPMailer();
$mail->Subject  = $subject;
$mail->Body	= $body;
$mail->AddAddress($toEmail, $toName);
$mail->From     = $from;
$mail->FromName = $fromName;
$mail->Host     = $host;
$mail->Mailer   = "smtp";
$mail->SMTPAuth = true;
$mail->Username = $username;
$mail->Password = $password;
$mail->Port 	= $port;

#
# attempt to attach the voicemail recording
#
if(!empty($mailbox) && !empty($msgnum))
{
	for($i=0; $i<=(5-strlen($msgnum)); $i++) $msgnum = "0" . $msgnum;
	$attach = str_replace("{MAILBOX}", $mailbox, $ast_vm_path) . "msg" . $msgnum . "." . $ast_vm_ext;
	#$mail->Body .= "\r\n" . $attach; # uncomment to debug if messages are not attached
	if(is_file($attach))
		$mail->AddAttachment($attach, "Message-". $mailbox ."-". $msgnum .".". $ast_vm_ext);
}

#
# send the email
#
if($mail->Send())
{
	echo "\r\nSent Ok! \r\n";
} else {
	echo "\r\nSend Failed... \r\n";
	echo $mail->ErrorInfo;
}

#
# function add to the args array
#
function add2array($str, &$args)
{
	if(preg_match("/^([a-zA-Z0-9]{1,}): (.+)/", $str, $matches))
	{
		$key = $matches[1];
		$val = $matches[2];
		$args[$key] = $val;
	}
}
5) Voice as mp3 file
http://www.voip-info.org/wiki/view/Asterisk+Voicemail
– voicemail.conf
mailcmd=perl /var/lib/asterisk/agi-bin/mp3vm.pl
– mp3vm.pl
#!/usr/bin/perl
open(VOICEMAIL,”|/usr/sbin/exim -t”);
open(LAMEDEC,”|/usr/bin/dos2unix|/usr/bin/base64 -di|/usr/bin/lame –quiet –preset voice – /var/spool/asterisk/tmp/vmout.$$.mp3″);
open(VM,”>/var/spool/asterisk/tmp/vmout.debug.txt”);
my $inaudio = 0;
loop: while(<>){ # read from STDIN that is passed from asterisk
if(/^\.$/){ #process line G that marks the end of email
last loop;
}
if(/^Content-Type: audio\/x-wav/i){
$inaudio = 1;}
if($inaudio){
while(s/^(Content-.*)wav(.*)$/$1mp3$2/gi){} # process line A-D
if(/^\n$/){ # process line E that marks the beginning of wav encoded content
iloop: while(<>){ # process line with wav encoded content and convert to mp3
print LAMEDEC $_;
if(/^\n$/){ #process line F that marks the end of wav encoded content
last iloop;
}
}
close(LAMEDEC);
print VOICEMAIL “\n”;
print VM “\n”;
open(B64,”/usr/bin/base64 /var/spool/asterisk/tmp/vmout.$$.mp3|”); # $$ stands for process id
while(<B64>){
print VOICEMAIL $_; # dump the while mp3 file
print VM $_;}
close(B64);
print VOICEMAIL “\n”;
print VM “\n”;
$inaudio = 0;
}
} # match the if ($inaudio)
print VOICEMAIL $_; # process lines that are not wav encoded related.
print VM $_;
}
print VOICEMAIL “\.”;
print VM “\.”;
close(VOICEMAIL);
close(VM);
#CLEAN UP THE TEMP FILES CREATED
#This has to be done in a separate cron type job
#because unlinking at the end of this script is too fast,
#the message has not even gotten piped to send mail yet
sample file:
Date: Mon, 18 Jan 2010 15:01:02 -0800
From: “Voicemail” asterisk@home
To: “Mr XYZ” <homenotify>
Subject: New message 2 in mailbox 2009
Message-ID: <Asterisk-2-1800285858-2009-6826@m9000t>
MIME-Version: 1.0
Content-Type: multipart/mixed; boundary=”—-voicemail_2200968261038445079″
This is a multi-part message in MIME format.
——voicemail_2200968261038445079
Content-Type: text/plain; charset=ISO-8859-1
Content-Transfer-Encoding: 8bit
Dear Mr XYZ:
just wanted to let you know you were just left a 0:23 long message (number 2)
in mailbox 2009 from an unknown caller, on Monday, January 18, 2010 at 03:01:02 PM. The message is attached. Thanks!
——voicemail_2200968261038445079
Content-Type: audio/x-mp3; name=”msg0002.mp3″ <—– line A
Content-Transfer-Encoding: base64Content-Description: Voicemail sound attachment.
Content-Disposition: attachment; filename=”msg0002.mp3″ <—- line D
<—- line E there is a \n
/+NIxAAAAAAAAAAAAFhpbmcAAAAPAAABRQACZSAAAwUHCg0PEhQXGhweISQmKCsuMDI2ODo9QEJF
R0………………….
…….
xnCmRrWzAqJRmKkhr24QhFQzTTA19b4RBwZfpYbFutHIam45DVDJIaoY5DVDBlVMQU1FMy45N1VV
VVVVVVVVVVVVVVVVVVVVVVVVVVVVVVVV/+MYxCIAAANIAcAAAFVVVVVVVVVVVVVVVVVVVVVVVVVV
VVVVVVVVVVVVVVVVVVVVVVVVVVVVVVVVVVVVVVVVVVVVVVVVVVVV
<—–line F there is a \n
——voicemail_2200968261038445079–
. <——line G this is the end of e-mail
as you can see, it is very easy to manipulate the file and add Bcc or CC
more perl tutorial: http://aplawrence.com/Unix/perlinput.html
6) voice to text
There are companies that sell such a service
http://www.phonewire.com/cc/voicemail?=/
http://www.tellme.com/business
http://www.spinvox.com/how_it_works.html http://forge.asterisk.org/gf/project/spintools/
7) Receive Fax and send as e-mail attachment
in extensions.conf
[macro-faxreceive]
exten => s,1,Set(FAXFILE=/var/spool/asterisk/tmp/${UNIQUEID}.tif)
exten => s,2,Set(EMAILADDR=abcdefg@gmail.com)
exten => s,3,rxfax(${FAXFILE})[fax]
exten => 2222,1,Macro(faxreceive)
exten => h,1,system(/var/lib/asterisk/agi-bin/mailfax ${FAXFILE} ${EMAILADDR} “${CALLERIDNUM} ${CALLERIDNAME}”)[default]
; Did we get a fax?
exten => fax,1,Goto(fax,2222,1)
and you have the file /var/lib/asterisk/agi-bin/mailfax
#!/bin/sh
FAXFILE=$1
RECIPIENT=$2
FAXSENDER=$3#tiff2ps -2eaz -w 8.5 -h 11 $FAXFILE | ps2pdf – | uuencode fax.pdf | mail -s “Fax sent from $FAXSENDER” $RECIPIENT
tiff2ps -2eaz -w 8.5 -h 11 $FAXFILE | ps2pdf – | mime-construct –to $RECIPIENT –subject “Fax from $FAXSENDER” –attachment fax.pdf –type application/pdf –file –
8) Send fax not implemented yet.
SIPBroker
1)PSTN Access number listed at: SIPBroker – PSTN Numbers
2)SIP Service providers list at SIPBroker – Provider White Pages
3)for instance, you have a SIP account at iptel.org , that should also has has alias xxxxxx@iptel.org where xxxxxx is a 6 digits number.
According to the list in 2) ,  *478 iptel.org Iptel
 ![]() [Home]
[Home]
suppose you want somebody who only has PSTN phone to reach you, then you need to look for an access number listed in 1) that is close to he/she so he/she can avoid long distance call.or a phone access number listed in 1) that services your city if long distance charge is not one concern. for example ,
Boston, MA +1-617-399-8298
after he/she dials that number, there is voice prompt he/she should then dial *478xxxxxx, where xxxxxx is got from step 3).
IPSec VPN vs. SSL VPN
HTC hero CDMA sprint
http://forum.xda-developers.com/forumdisplay.php?f=519
http://www.androidin.net/bbs/viewthread.php?tid=23700&from=favorites
http://www.androidin.net/bbs/thread-28142-1-1.html
chapter 1. Radio
什么是radio,怎么刷radio?
这个Radio指代的是通讯模块,就是手机里面负责信号部分的模块,PDA类型的手机,基本都强调这么个概念。一个是PDA,一个是手机(貌似是句废话- -),举个很简单的例子,以三星的PPC手机为例,比如i718.比如i908,他们在刷机的时候(所谓刷机就是重装系统)一般都是分两部分,第一部分刷手机部分,第二部分刷PDA部分,而且两部分基本不相干。
radio 版本的查看:可以在设置->关于手机里查看到,baseband版本就是。 比如我的是:1.04.01.09.21
刷radio和刷rom的操作基本相同,radio可以在modaco论坛 下载,同样也是zip包,放到sd卡下,用home+挂机键 开机进入recovery,刷入这个zip文件,中间会要你重启一次(第一个选项重启),进入一个中间有一个盒子的界面,耐心等待,直到下方会提示“fomating cache…….”,这个时候才是已经刷完了!
chapter 2. ROM
2.1 我怎么知道我手机的rom版本?这个版本是高还是低?
进入设置->关于手机->Build Number(内部版本) 就是你手机的rom版本,格式一般为1.23.456.7或者1.23.456.78,其中1.23为大版本号,目前最新的版本号是2.73,7或者78为小版本号(姑且这么说吧),版本号数字越大越新,456感觉为区域号。比如说目前官方提供的通用rom是 2.73.405.5,而最新的通用rom版本是2.73.405.61,其中405就是通用区域号。
另外也有部分是一些自制版本,比如modaco或者drizzy等,他们会在内部版本或者软件版本那儿把自己的大名写进去,比如modaco 3.0,大家可以去modaco的论坛或者 xda的论坛 或者 本论坛的FLZYUP的rom搜索最新的版本情况。
2.2 刷rom之前我要做什么?
如果选择官方RUU直接升级, 可以参考htc website. http://www.androidin.net/bbs/viewthread.php?tid=15867
如果刷其他rom,你需要有recovery.img,recovery就是你用home键+开机键开机后能进入的一个界面,在这个界面你可以直接用sd卡上的zip的rom升级或者备份你的系统.
老版本的recovery只有三个选项,无法备份系统,只能用update.zip这个文件名的文件升级,不能用任何文件名的zip文件升级。
Step 1 ) root
什么是root?我需要它做什么?
root就是你手机的boss,它可以访问和修改你手机几乎所有的文件,这些东西可能是制作手机的人不愿意你修改和触碰的东西,因为他们有可能影响到手机的稳定.
– 推荐刷带root权限的rom来实现
– 或者 通过asroot2.
http://theunlockr.com/2009/11/07/how-to-root-your-cdma-htc-hero-sprint-verizon/comment-page-1/
http://forum.xda-developers.com/showthread.php?t=583291
step 2) recovery image installation
http://forum.xda-developers.com/showthread.php?t=596879
Approach 1) via fastboot + adb -> In case you don’t have a custom recovery
adb shell reboot bootloader
fastboot boot recovery-RA-heroc-v1.5.2.img
adb shell mount /sdcard
adb push recovery-RA-heroc-v1.5.2.img /sdcard/recovery-RA-heroc-v1.5.2.img
adb shell flash_image recovery /sdcard/recovery-RA-heroc-v1.5.2.img
adb shell reboot
Approach 2)
Copy recovery-RA-heroc-v1.5.2.img to the root of your sdcard
Boot into your current custom recovery (boot while holding HOME)
Connect your Hero via usb to your pc/mac/...
adb shell
$su (not required if you have root already)
#mount -a
#flash_image recovery /sdcard/recovery-RA-heroc-v1.5.2.img
step 3) flash a ROM that you like
modaco为什么有那么多rom?什么意思?
‘Core’: 这个是基本的rom
‘Core Chinese’: 这个是加了中文支持的rom,可以直接调出中文
‘Enhanced’ add on pack: 这个增加了三个软件的增强版(须先刷前两个rom),三个软件一个是名片扫描,论坛已有,一个是wap浏览器,用处不大,一个是flurk,已经被防火墙,国内用不了
‘Wavesecure’ add on pack: 这个把手机保护软件wavesecure加到rom里,不能直接删除它,能更好的保护手机
‘Boot Sounds’ add on pack: modaco的rom现在是无声启动的,刷入这个可以调出声音
首先刷最上面两个rom中任何一个,其他的自行添加,方法和刷rom一样。
fresh rom
i would recommend this rom
– install fresh rom 1.0
http://forum.xda-developers.com/showthread.php?t=584032
chapter 2.3. 刷完的rom我想删除不要的软件可以吗?
其实那些不用的软件很容易删除的,它们都放在system/app文件夹下,如果你有root权限,只要进去文件夹,打开读写,把不要的软件移动出来到就好了。比如,如果你不要youtube,就把system/app文件夹下的youtube.apk移动到sd卡上就好了,它就消失在你的所有程序里了。当然,有些文件放在system/lib下,你找到文件名相同的删除就好了。在adb shell,或terminal里,remount system的写权限,然后rm。
root explorer程序可大大的方便我们的工作,以往的许多敲命令才能实现的操作,通过root explorer,可以方便的实现。
chapter 3. APP2SD
http://www.androidin.net/bbs/viewthread.php?tid=821
google手机的软件为了安全性和稳定性都是默认安装到手机内存里,但是手机内存有限,所以我们会做app2sd操作,来让我们安装的软件放到sd卡上,而google的android系统是基于linux的,所以sd卡上本身的fat格式是不会被识别的,所以我们要分区(第二分区)出来,格式成linux认识的ext2或3或4格式,在用链接命令,把这个分区映射成一个系统文件夹system/sd(大概这个意思),把所有的软件装到这个“文件夹”下,这就是app2sd的操作。
app2sd的操作其实是牺牲了一部分软件的速度和稳定性来换取更多的手机内存安装更多的软件。另外,app2sd只是把软件放到了sd卡上,运行软件还是需要占用手机的内存的,所以,你装了软件之后,一般手机内存还是会减少一些。你如果安装的软件在70个以内,个人觉得没有必要,呵呵,如果很多游戏软件除外,此外,使用app2sd最大的好处就是,刷一个带app2sd的rom之后,以后升级这个rom(依然带app2sd)的时候,你的软件都会完整保存(个别除外,比如htc input chinese需要重新添加几个文件到system/lib下)。
1)apptosd發展到現時,很多ROM都是自動進行 APPTOSD 的。主要要求用家自行對SD進行分區操作。modaco的自制rom可以自动app2sd,但需要你自己先将你的sd卡分出一个ext的分区,并且是第二分区,也就是在你以后文件的分区后面,用读卡器操作比较好,可以无损分区。 分区之后再刷rom便可以自动app2sd,有朋友在刷完rom之后分区,重启后hero自动变成了app2sd。
2)however, 我们可以手动的利用sdk中的adb工具實現apptosd
adb shell
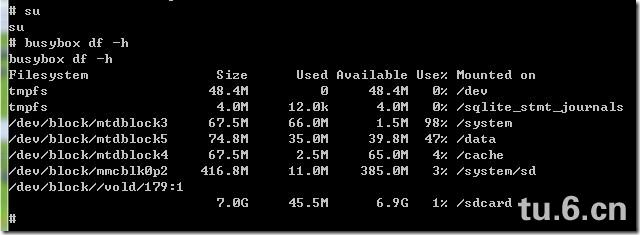
subusybox df -h
如圖:圖中為我機子的8g卡。留意第十一行
416.8M 11.0M 385.0M 3% /system/sd
這是我卡中的一個416.8m的EXT2分區。如果你也有這一項。那你可以完成接下來的工作了。
mkdir /system/sd/app
cp -a /data/app /system/sdrm -r /data/app
ln -s /system/sd/app /data/app
reboot
如何知道成功沒有:在重啟後裝入一個軟件。
利用adb工具輸入以下指令 : adb shell ls /system/sd/app/
如果看到你剛裝入的軟件那你就ok啦!!!
以後刷機。只要重新连接,不需要再装软件了。
adb shell
subusybox df -h
cd /data
cp -a app /system/sd
rm -r app
ln -s /system/sd/app /data/app
reboot
裝在sd卡的app就能回覆,不用重裝软件了.
chapter 4. Misc
– How to push a file?
adb push recovery-RA-heroc-v1.5.2.img /sdcard
– How to enter recovery mode?
approach 1:
- adb shell
reboot recoveryapproach 2:
- powering off the phone and holding Home while you power it on.
– Mount system in read / write mode
1. Identifying the /system partition device file:
C:\android-sdk-windows-1.1_r1\tools>adb shell
$ su
# mount
rootfs / rootfs ro 0 0tmpfs /dev tmpfs rw,mode=755 0 0
devpts /dev/pts devpts rw,mode=600 0 0
proc /proc proc rw 0 0
sysfs /sys sysfs rw 0 0
tmpfs /sqlite_stmt_journals tmpfs rw,size=4096k 0 0
/dev/block/mtdblock3 /system yaffs2 ro 0 0
/dev/block/mtdblock5 /data yaffs2 rw,nosuid,nodev 0 0
/dev/block/mtdblock4 /cache yaffs2 rw,nosuid,nodev 0 0
/dev/block/mmcblk0p1 /sdcard vfat rw,dirsync,nosuid,nodev,noexec,uid=1000,gid=1000,fmask=0711,dmask=0700,codepage=cp437,iocharset=iso8859-1,utf8 0 0
note : /dev/block/mtdblock3 is the /system partition device file.
2. Remounting the /system in read-write mode:
# mount -o remount,rw -t yaffs2 /dev/block/mtdblock3 /system
3. If necessary set read-write permission to any directory under /system. Don’t forget to revert back once you get what you are intended to do.
# chmod 777 /system/fonts
4. Exit the hacker session
# exit
$ exit
– Mount /data
adb shellmount -o rw /dev/block/mtdblock5 /data
– How to update a file ?
appoach 1 : edit by vi in phone;
approach 2 : adb pull/push
adb pull /data/data/com.htc.android.htcime/shared_prefs/com.htc.android.htcime_preferences.xml . (remember the dot!)
Save the file and push it back to the phone and reboot.
adb push com.htc.android.htcime_preferences.xml /data/data/com.htc.android.htcime/shared_prefs/com.htc.android.htcime_preferences.xml
SRV and NAPTR
Sample SRV and NAPTR
bigu.edu IN SOA ns.bigu.edu. root.bigu.edu. (
          2003032001
          10800
          3600
          604800
          86400 )

bigu.edu.             43200 IN NS      ns.bigu.edu.
;
ns.bigu.edu.          43200 IN A       10.0.0.20
sipserver1.bigu.edu.  43200 IN A       10.0.0.21
sipserver2.bigu.edu.  43200 IN A       10.0.0.22
;
_sip._udp.bigu.edu.   43200 IN SRV 0 0 5060  sipserver1.bigu.edu.
_sip._udp.bigu.edu.   43200 IN SRV 1 0 5060  sipserver2.bigu.edu.
_sip._tcp.bigu.edu.   43200 IN SRV 0 4 5060  sipserver1.bigu.edu.
_sip._tcp.bigu.edu.   43200 IN SRV 0 2 5060  sipserver2.bigu.edu.
_sips._tcp.bigu.edu.  43200 IN SRV 0 0 5060  sipserver1.bigu.edu.
_sips._tcp.bigu.edu.  43200 IN SRV 0 0 5060  sipserver2.bigu.edu.
;
bigu.edu. IN NAPTR 0 0 "s" "SIPS+D2T" "" _sips._tcp.bigu.edu.
bigu.edu. IN NAPTR 1 0 "s" "SIP+D2T"  "" _sip._tcp.bigu.edu.
bigu.edu. IN NAPTR 2 0 "s" "SIP+D2U"  "" _sip._udp.bigu.edu.
NAPTR records are not necessary but if they are present RFC3263 mandates at least three records. It further states that they should be listed in this precedence: 1) SIPS+D2T, 2) SIP+D2T and SIP+D2U. In common English this means that TLS over TCP should be used if the calling party has the capability. Failing that TCP should be used and UDP is permitted only as a last resort to keep the call from failing.
In practice BIND implementations are often smart enough to return the SRV records in the target field and the A records to which they point among the glue data so that additional DNS lookups are not required. (how is the return looked like?, I need a sample)
In terms of call flow then a SIP User Agent Client first sends a DNS NAPTR request to the domain specified in the Request-URI. If valid records are returned an appropriate transport is identified. Depending on the richness of the glue data in the first request, a second request is sent to the value in the substitution field.
If no NAPTR records are returned, a DNS SRV request is sent based on the transport preferred by the UAC. IF valid records are returned, the request is sent to the preferred proxy.
As a last resort if no SRV records are found a DNS A record request is sent for the domain in the Request-URI. In the case of sip:alice.smith@bigu.edu the request would be for the IP address of bigu.edu. If a valid IP address is returned, the request is sent to that address using UDP.
The best practice for sites wanting just to get started may be to implement SRV records but not NAPTR records. Those wishing complete detailed information on service location are referred to RFCs 2782, 3263 and 3403.
Format of SRV
"_Service._Proto.Name TTL Class SRV Priority Weight Port Target"
Format of NAPTR
"domain-name TTL Class NAPTR order preference flags service regexp target"
Hello world!
Welcome to WordPress.com. This is your first post. Edit or delete it and start blogging!


leave a comment